Flash Freeze Strawberries: Lock in Flavor, Avoid Icy Clumps
There's nothing quite like the taste of a perfectly ripe, juicy strawberry. Whether you've just harvested a bounty from your garden, brought home a overflowing punnet from the local farmers' market, or simply snagged a great deal at the supermarket, these ruby-red gems are a seasonal delight. The only downside? Their notoriously short shelf life. Even with careful refrigeration, fresh strawberries typically begin to wrinkle, soften, or show signs of mold within three to four days, leaving you scrambling to use them all before they spoil.
But what if you could capture that peak-season freshness and enjoy it months later? You can! Freezing strawberries is an incredibly effective way to preserve their vibrant flavor and nutritional value. However, simply tossing them into a freezer bag is a common mistake that leads to a disappointing, icy block of berries. The secret to success lies in a technique called flash freezing. This method ensures each berry freezes individually, preventing clumps, minimizing ice crystal formation, and preserving their natural texture and taste for future enjoyment.
Ready to unlock a year-round supply of delicious strawberries? This comprehensive guide will walk you through the best way to freeze strawberries, guaranteeing a perfect outcome every time.
Why Flash Freezing is the Game-Changer for Strawberries
Before we dive into the steps, let's understand why flash freezing is so critical for strawberries:
- Prevents Icy Clumps: The most immediate benefit. By freezing berries in a single layer first, they solidify individually. This means you can scoop out just a handful for a smoothie or a cup for a recipe without having to chip away at a giant, frozen boulder.
- Locks in Peak Flavor: Freezing berries at their peak ripeness ensures that their sweet, tangy flavor is sealed in. Flash freezing minimizes the time it takes for the berries to reach a frozen state, reducing cellular damage and preserving more of their natural taste and nutrients.
- Minimizes Ice Crystals: Slow freezing allows large ice crystals to form within the fruit's cells, which rupture the cell walls. When thawed, this leads to a mushy texture and a loss of moisture and flavor. Flash freezing creates much smaller ice crystals, maintaining the berry's structure and resulting in a better texture when you're ready to use them.
- Extends Shelf Life: Properly flash-frozen strawberries can last for up to 6 months (and often longer!) in the freezer, allowing you to enjoy summer's bounty deep into the colder months. This is an excellent way to prevent food waste and save money.
Essential Tools for Freezing Strawberries
Gathering your supplies beforehand will make the freezing process smooth and efficient:
- Colander: For thoroughly rinsing your berries.
- Two Tea Towels or Paper Towels: Crucial for drying the berries completely. Absorbent tea towels are an eco-friendly choice.
- Paring Knife or Strawberry Huller: To efficiently remove the green tops and white core. A huller makes quick work of this task.
- Large Baking Sheet(s): You'll need enough surface area to spread your berries in a single layer without touching.
- Parchment Paper or Silicone Baking Mats: To line your baking sheets, preventing berries from sticking to the tray.
- Zip-Top Silicone or Plastic Freezer Bags: For long-term, airtight storage. Silicone bags are a reusable, sustainable option.
- Permanent Marker: For labeling your freezer bags with the date and contents.
Step-by-Step Guide: How to Freeze Strawberries Perfectly
Step 1: Select, Wash, and Thoroughly Dry Your Berries
The journey to perfectly frozen strawberries begins with selection. Choose ripe, firm berries that are free from blemishes, mold, or mushy spots. Any berries already showing signs of spoilage will not freeze well and could affect the quality of the entire batch.
Once selected, place your strawberries in a colander and rinse them gently under cold running water. Avoid letting them soak, as this can make them waterlogged. After rinsing, this next step is arguably the most crucial for preventing mushy, flavorless berries: thorough drying. Spread the washed berries onto one clean tea towel or several layers of paper towels. Use a second towel to gently pat each berry dry. Then, allow them to air dry for an additional 30 to 60 minutes. Any excess water will turn into ice crystals, leading to a poorer texture and diluted flavor when thawed.
Step 2: Hull and Prep (Whole or Cut)
Once your berries are completely dry, it's time to hull them. This involves removing the green leafy tops and the small, white, tough core just beneath the stem. A strawberry huller makes this quick and easy, but a small paring knife works perfectly too. Insert the knife at the shoulder of the berry, just below the stem, and cut around in a circular motion to "pop out" the hull.
Now, decide if you want to freeze your berries whole or cut. This choice largely depends on how you plan to use them:
- Whole: Ideal for recipes where presentation matters or if you prefer larger pieces.
- Halved or Quartered: Excellent for smoothies (makes blending much easier!), sauces, jams, or baking. Cutting larger berries into smaller pieces before freezing is highly recommended, as they are very difficult to slice once frozen solid.
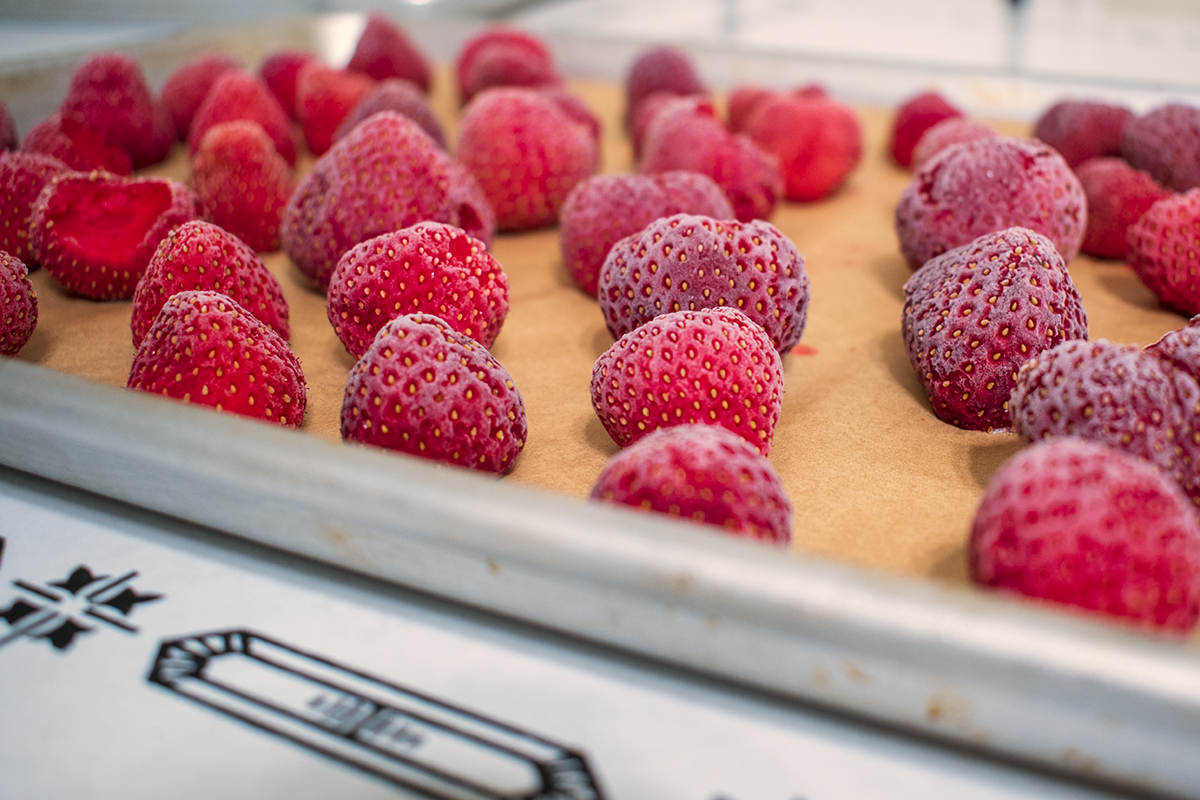
Step 3: The Flash Freeze – Spaced Out on a Tray
This is where the magic of flash freezing happens. Line one or more large baking sheets with parchment paper or a silicone baking mat. Arrange your hulled (and optionally cut) strawberries in a single layer on the prepared baking sheet. It is absolutely critical that the berries do not touch each other. If they are in contact, they will freeze together into an inseparable mass, defeating the purpose of flash freezing.
If you have a large batch of berries, use multiple baking sheets, or freeze them in batches. Place the baking sheets in your freezer, ensuring they are level. Allow the strawberries to freeze until they are completely solid. Depending on their size and your freezer's temperature, this usually takes between two to four hours. For very large berries or generous batches, it's often best to freeze them overnight to ensure they are rock-hard.
Step 4: Transfer to Long-Term Storage
Once your strawberries are individually frozen solid, they're ready for long-term storage. Carefully remove them from the baking sheet (they should pop off easily thanks to the parchment paper). Transfer the frozen berries into zip-top freezer bags or sturdy, airtight containers.
For optimal freshness and to prevent freezer burn, remove as much air as possible from the bags. You can do this by flattening the bag and pressing the air out, or even by using a straw to suck out the remaining air before sealing. Fill the bags or containers tightly, leaving minimal empty space. Don't forget to label each bag or container with the date of freezing and the contents. Properly stored, your frozen strawberries will preserve their bounty for 6 months, though they can often remain good for longer if freezer burn is avoided.
Maximizing Your Frozen Strawberry Experience
How Long Do Frozen Strawberries Last?
As mentioned, properly flash-frozen strawberries will maintain their quality for up to 6 months in a standard home freezer. While they might still be safe to eat beyond this timeframe, their quality (texture, flavor, and color) may begin to degrade due to freezer burn or general deterioration.
To minimize freezer burn, ensure your berries are in airtight containers with as little air as possible. A consistent freezer temperature (0°F / -18°C or lower) is also key.
Creative Ways to Use Your Frozen Strawberry Stash
The beauty of having a freezer full of individually frozen strawberries is their versatility. Here are some delicious ideas:
- Smoothies: The ultimate no-thaw option! Simply toss a handful into your blender with other fruits, yogurt, and liquid for a refreshing drink.
- Sauces & Syrups: Simmer with a little sugar and lemon juice to create a vibrant sauce for pancakes, waffles, cheesecake, or ice cream.
- Jams & Preserves: Frozen strawberries are perfect for making homemade jams and preserves any time of year.
- Baked Goods: Incorporate into muffins, scones, pies, tarts, or crumbles. You can often add them directly to batters without thawing, though they might release a bit more liquid.
- Purees: Blend into a vibrant puree for cocktails (like daiquiris or margaritas), mocktails, or a healthy topping for yogurt and oatmeal.
- Yogurt/Oatmeal Topping: A few frozen berries can be a delightful, cooling addition to your morning meal, slowly thawing as you eat.
Troubleshooting Common Freezing Mistakes
- Mushy Berries: Almost always a result of not drying the berries thoroughly enough before freezing. Excess water forms large ice crystals that damage cell walls.
- Clumped Berries: You likely skipped or rushed the flash-freezing step, allowing berries to touch on the baking sheet.
- Freezer Burn: Indicated by dry, discolored patches. This happens when berries are exposed to air in the freezer. Ensure airtight packaging and remove as much air as possible from bags.
- Lackluster Flavor: Can occur if berries weren't ripe enough when frozen, or if they've been in the freezer for too long and started to deteriorate.
Conclusion
Freezing strawberries is a simple yet incredibly rewarding process that allows you to savor the taste of summer long after the season has passed. By following these easy steps, especially the crucial flash-freezing technique, you'll avoid common pitfalls like icy clumps and mushy textures. Instead, you'll be able to enjoy perfectly preserved, flavorful berries ready for all your culinary creations. So, next time you find yourself with an abundance of fresh strawberries, don't let them go to waste – flash freeze them and lock in that delicious flavor for months to come!
